Installing floating shelves has become a cornerstone of modern home organization, but what happens when your perfect shelf placement doesn’t align with wall studs? Many homeowners face this common dilemma and wonder if it’s possible to safely mount floating shelves directly to drywall. The answer is yes—with the right techniques, materials, and safety considerations.
Understanding how to properly install floating shelves without studs opens up unlimited design possibilities while maintaining the structural integrity that keeps your belongings secure. This comprehensive guide will walk you through professional-grade techniques that ensure your floating shelves remain both beautiful and functional for years to come.

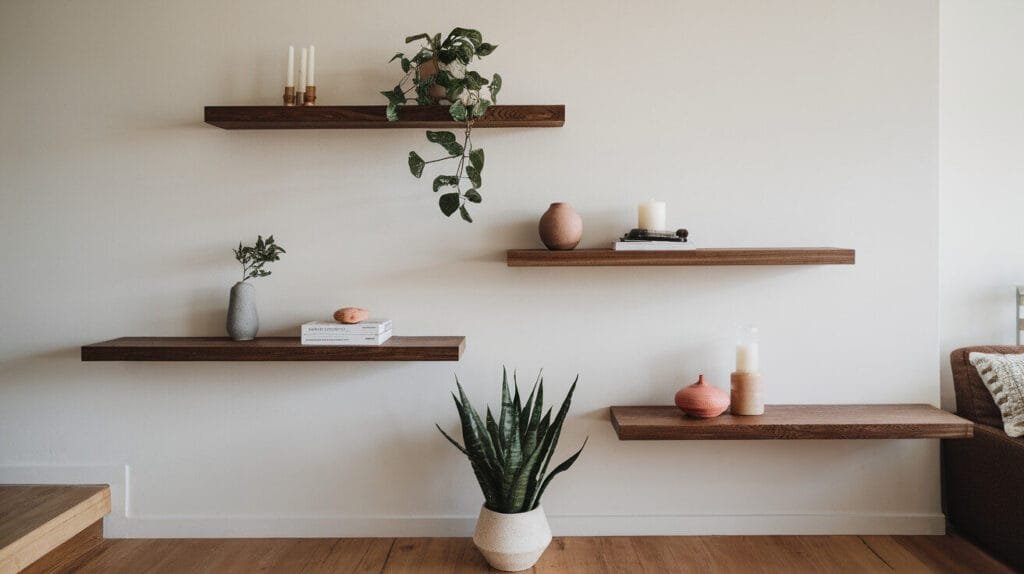
- Modern & Simplistic – Create a personalized display with our sleek wooden floating shelves that offer a contemporary des…
- Protection Sealing – Each shelf is treated with a protective sealant to prevent warping or damage
- Versatile Design – These shelves can be easily placed in any room, from your cozy bedroom to your functional kitchen or …

Understanding Wall Stud Limitations in Modern Homes
Most homes built with standard construction methods feature wall studs spaced 16 inches apart, with some older constructions using 24-inch spacing. This predetermined spacing often conflicts with optimal shelf placement for both aesthetic and functional purposes.
The challenge becomes particularly apparent in bathrooms, kitchens, and living spaces where plumbing, electrical work, or architectural features interfere with ideal stud locations. Professional installers report that approximately 60% of floating shelf installations require alternative mounting methods due to stud placement constraints.
According to Shelfology’s comprehensive installation data, while floating shelves mounted to studs can support 45-50 pounds per stud attachment point, proper drywall anchor installations can safely support 15-25 pounds per anchor when executed correctly.
Essential Tools and Materials for Stud-Free Installation
Successful floating shelf installation without studs requires specific materials engineered for drywall mounting applications. Quality matters significantly in this scenario, as substandard hardware can lead to catastrophic failure.
Heavy-Duty Drywall Anchors:
- Toggle bolts for maximum holding power (rated 50+ lbs per anchor)
- Molly bolts for hollow wall applications
- Self-drilling anchors for quick installation
- Expansion anchors for solid drywall applications
Professional Installation Tools:
- High-quality stud finder for verification
- Level (minimum 24-inch length recommended)
- Drill with appropriate bits
- Screwdriver set
- Measuring tape and pencil
- Safety glasses and dust mask
The Home Depot’s professional installation guide emphasizes the importance of matching anchor type to both wall material and anticipated load requirements.
Weight Capacity Guidelines for Different Installation Methods
Understanding weight limitations prevents overloading and ensures long-term stability. Professional installation standards provide clear guidelines for different mounting scenarios.
Stud-Mounted Capacity: Standard stud mounting supports 45-50 pounds per attachment point, making a two-stud installation capable of supporting approximately 100 pounds when properly distributed.
Drywall-Only Mounting Capacity: Quality drywall anchors typically support 15-25 pounds per anchor point, depending on anchor type and drywall thickness. A properly installed four-anchor system can safely support 60-100 pounds total.
Critical Weight Distribution Principles:
- Distribute weight evenly across the shelf length
- Avoid concentrated loads at shelf ends
- Consider dynamic loading from adding/removing items
- Account for gradual material fatigue over time
Interior design professionals recommend limiting drywall-mounted shelves to items weighing 20 pounds or less to maintain a safety margin that accounts for real-world usage patterns.


Step-by-Step Installation Process Without Studs
Phase 1: Planning and Measurement
Begin by determining exact shelf placement using a level and measuring tape. Mark desired shelf positions lightly with pencil, ensuring measurements account for shelf brackets and desired spacing between multiple shelves.
Standard floating shelf spacing ranges from 12-18 inches vertically, though this can be adjusted based on intended use. Kitchen applications often require closer spacing for accessibility, while decorative displays benefit from increased spacing to create visual breathing room.
Phase 2: Wall Preparation
Verify wall construction using a stud finder, confirming the absence of studs in your desired installation area. Check for electrical wiring or plumbing that could interfere with anchor installation. Many homes have horizontal blocking or pipes that won’t register on standard stud finders.
Mark precise anchor locations using your shelf bracket as a template. For most floating shelves, this involves marking 2-4 anchor points per bracket, depending on shelf length and intended load.
Phase 3: Anchor Installation
Drill pilot holes appropriate for your chosen anchor type. Hole size is critical—too large reduces holding power, while too small can crack drywall during anchor insertion.
Install anchors according to manufacturer specifications, ensuring they sit flush with the wall surface. Toggle bolts require careful insertion technique to ensure proper expansion behind the drywall.
Phase 4: Bracket Mounting and Shelf Installation
Mount brackets using appropriate screws, checking level alignment before fully tightening. Slide shelves onto brackets according to manufacturer instructions, ensuring proper engagement with mounting hardware.
Test installation with light pressure before adding any items, verifying secure attachment and level placement.
Special Considerations for High-Moisture Environments
Bathroom floating shelves require additional moisture-resistant considerations beyond standard installation techniques. High humidity environments present unique challenges that can compromise both shelf materials and mounting hardware over time.
Moisture-Resistant Anchor Selection: Stainless steel or coated anchors prevent corrosion that can weaken mounting strength. Standard steel anchors may rust and fail prematurely in bathroom environments.
Sealant Application: Apply appropriate sealant around anchor points to prevent moisture penetration behind drywall. This prevents mold growth and maintains drywall integrity around mounting points.
Material Selection: Choose shelf materials specifically rated for bathroom use. Solid wood shelves require proper sealing with polyurethane or marine-grade finishes. Composite materials often provide better moisture resistance for bathroom applications.
Proper ventilation remains critical for any bathroom floating shelf installation. Exhaust fans should operate during and after shower use to minimize condensation that can affect both shelves and mounting hardware.
Common Installation Mistakes and How to Avoid Them
Inadequate Weight Distribution
Many homeowners underestimate the cumulative weight of displayed items. Books, decorative objects, and toiletries add up quickly, often exceeding initial weight estimates.
Solution: Weigh intended shelf contents before installation and plan for 25% additional capacity to accommodate future additions.
Wrong Anchor Selection
Using generic drywall anchors for floating shelf applications often results in failure. Standard plastic anchors lack the holding power required for shelf installations.
Solution: Invest in heavy-duty anchors specifically rated for shelf mounting applications, even if initial costs are higher.
Poor Level Alignment
Crooked shelves appear unprofessional and can create stress concentrations that lead to mounting failure over time.
Solution: Use a quality level during installation and double-check alignment before final tightening. Consider using a laser level for multiple shelf installations.
Ignoring Wall Material Variations
Not all drywall installations are identical. Thickness, backing material, and age affect anchor performance significantly.
Solution: Test anchor holding power in an inconspicuous area before proceeding with full installation.
- Modern & Simplistic – Create a personalized display with our sleek wooden floating shelves that offer a contemporary des…
- Protection Sealing – Each shelf is treated with a protective sealant to prevent warping or damage
- Versatile Design – These shelves can be easily placed in any room, from your cozy bedroom to your functional kitchen or …
Professional vs. DIY Installation: Cost-Benefit Analysis
Professional floating shelf installation typically costs $150-400 per project, depending on complexity and regional labor rates. DIY installation materials cost $25-75 for most standard applications, making the cost differential significant for budget-conscious homeowners.
DIY Advantages:
- Substantial cost savings (70-80% less than professional installation)
- Complete control over timing and process
- Learning opportunity for future projects
- Satisfaction of personal accomplishment
Professional Installation Benefits:
- Guaranteed results and often warranty coverage
- Experience with problem-solving unexpected issues
- Access to professional-grade tools and materials
- Time savings for busy homeowners
Decision Factors: Consider professional installation for shelves intended to support valuable or fragile items, installations in difficult locations, or when local building codes require professional work.
Most homeowners find DIY installation rewarding and achievable with proper preparation and quality materials.
Safety Guidelines and Load Testing
Safety should never be compromised in floating shelf installations. Proper load testing verifies installation integrity before trusting shelves with valuable or fragile items.
Initial Load Testing: After installation, gradually add weight while monitoring for movement or sagging. Begin with 25% of intended load, increasing incrementally to full capacity over several days.
Ongoing Maintenance: Inspect mounting points quarterly, checking for looseness or signs of stress. Retighten hardware as needed, particularly in the first month after installation as materials settle.
Warning Signs:
- Visible sagging or deflection
- Cracks around anchor points
- Loose or wobbly shelves
- Sounds from mounting hardware
Address any warning signs immediately by reducing load or reinforcing the installation.
Maximizing Small Space Storage Efficiency
Small space floating shelf strategies focus on vertical storage optimization and multi-functional design approaches that maximize utility without overwhelming limited square footage.
Vertical Integration Techniques: Staggered shelf arrangements create visual interest while maximizing storage capacity. Varying shelf lengths prevents the monotonous appearance that can make small spaces feel cramped.
Multi-Purpose Applications: Consider floating shelves that serve multiple functions, such as display and task lighting integration or shelves with built-in hooks for additional hanging storage.
Color and Material Coordination: Light-colored shelves help small spaces feel larger by reflecting available light. Matching shelf materials to wall colors creates seamless integration that doesn’t visually fragment limited space.
Strategic Placement Principles: Position shelves at eye level in frequently used areas, with less-accessed storage placed higher. This approach maintains functionality while keeping daily-use items easily accessible.
Current Design Trends and Style Integration
Modern floating shelf design emphasizes clean lines and seamless integration with existing architecture. 2025 trends favor mixed materials, sustainable options, and shelving that serves as architectural detail rather than obvious storage additions.
Material Trending:
- Reclaimed wood with protective finishes
- Powder-coated metal in matte finishes
- Glass shelves with minimalist brackets
- Composite materials with wood-grain textures
Style Integration Approaches: Contemporary installations often feature shelves that appear to emerge from the wall itself, using concealed brackets and careful color matching. This approach works particularly well in minimalist and Scandinavian design schemes.
Lighting Integration: LED strip lighting beneath floating shelves creates ambient illumination while highlighting displayed items. This technique works especially well in kitchens and bathrooms where task lighting improves functionality.
Troubleshooting Common Problems
Even well-planned installations can develop issues over time. Understanding common problems and their solutions helps maintain shelf performance and appearance.
Shelf Sagging: Often indicates overloading or anchor failure. Reduce load immediately and inspect mounting hardware. Consider adding additional support anchors or upgrading to higher-capacity hardware.
Mounting Hardware Loosening: Common in the first few weeks after installation as materials settle. Periodic retightening usually resolves the issue. Persistent loosening may indicate inadequate anchor selection for the load.
Visible Wall Damage: Cracks or holes around mounting points suggest overloading or improper installation. Professional evaluation may be necessary to determine if wall reinforcement is needed.
Uneven Shelves: Can develop due to wall settling or mounting hardware shifts. Use adjustable brackets when possible to accommodate minor adjustments without reinstallation.
Long-Term Maintenance and Care
Proper maintenance extends floating shelf life significantly while maintaining appearance and function. Establish regular inspection and cleaning schedules appropriate for your installation environment.
Monthly Inspections: Check mounting hardware tightness and shelf alignment. Look for signs of stress or material degradation, particularly in moisture-prone environments.
Seasonal Deep Cleaning: Remove all items and clean shelves thoroughly, including underneath surfaces that collect dust. This provides opportunity to inspect mounting points and make minor adjustments.
Load Management: Periodically evaluate shelf contents, removing unnecessary items that contribute to loading without adding functional or aesthetic value. Consider seasonal rotation of decorative items to reduce constant loading.
Hardware Upgrades: Technology improvements in mounting hardware may justify upgrades every 3-5 years, particularly for heavily loaded shelves or high-value applications.
Conclusion: Achieving Professional Results
Installing floating shelves without wall studs requires careful planning, quality materials, and attention to detail, but the results can rival professional installations when executed properly. Understanding weight limitations, selecting appropriate hardware, and following proven techniques ensures both safety and aesthetic success.
The key to successful stud-free floating shelf installation lies in matching your approach to your specific requirements and environment. Whether you’re creating storage solutions for a small bathroom, organizing a home office, or adding decorative display space to your living room, these techniques provide the foundation for installations that perform reliably for years to come.
Remember that every home and situation is unique. Don’t hesitate to consult with professionals when installations involve valuable items, challenging locations, or loads approaching maximum capacity ratings. Your safety and satisfaction are worth the investment in proper planning and execution.
For homeowners ready to transform their wall space into functional and beautiful storage, floating shelves offer unlimited possibilities when installed with the right techniques and materials. Start with your first project, learn from the experience, and build confidence for more ambitious installations in the future.

Frequently Asked Questions
Q: How much weight can floating shelves hold without studs? A: Quality drywall anchors can support 15-25 pounds per anchor point. A four-anchor installation can safely support 60-100 pounds when properly distributed, though 20 pounds or less provides a safer margin for long-term reliability.
Q: What’s the best type of anchor for floating shelves? A: Toggle bolts provide maximum holding power for drywall-only installations, rated at 50+ pounds per anchor. Self-drilling anchors offer easier installation for lighter loads, while molly bolts work well for medium-duty applications.
Q: Can I install floating shelves in bathrooms without studs? A: Yes, but use stainless steel or coated anchors to prevent corrosion, apply sealant around mounting points, and choose moisture-resistant shelf materials. Ensure adequate ventilation to minimize humidity-related issues.
Q: How far apart should floating shelves be spaced? A: Standard spacing ranges from 12-18 inches vertically, adjustable based on intended use. Kitchen applications often need closer spacing for accessibility, while decorative displays benefit from increased spacing for visual appeal.
Q: What tools do I need for DIY floating shelf installation? A: Essential tools include a quality stud finder, level (24-inch minimum), drill with appropriate bits, screwdriver set, measuring tape, pencil, safety glasses, and dust mask. Quality tools significantly improve results and safety.
Disclosure: This post contains affiliate links. If you make a purchase through these links, I may earn a small commission at no extra cost to you.